
This post may contain affiliate links. This won’t change your price, but may share some commission. Read my full disclosure here.
After selling off my old furniture, I needed a coffee table — quick! Using scrap lumber and hairpin legs, I created a quick DIY hairpin leg coffee table that anyone can build in an afternoon.
Hey folks! I’m anticipating that there are going to be more than my usual readers visiting today’s post because of the #2x4andMore Challenge blog hop from Remodelaholic, so for those of you who haven’t been here before, I’m Sarah — I do lots and lots of DIY projects and have a tendency to make a giant mess. I’m currently remodeling my “bad luck” primary bathroom and have about 5,903 other things on my to-do list yet unfinished.
For those of you who have followed the blog though, then today is a day where I fulfill my promise and share the details on that new coffee table I have been hinting at on Instagram. You know — the one I whipped up for a date night because I sold off all my living room furniture and then we had no place to put our pizza. That coffee table.

There’s nothing quite like having a new white rug and nowhere to comfortably rest a glass of red wine that will motivate you to whip up a new piece of furniture! And even though the staining and finishing of the table took the better part of a day, I can honestly say that I cut all the pieces for this table in about 15-20 minutes using only the scrap wood I had on hand.
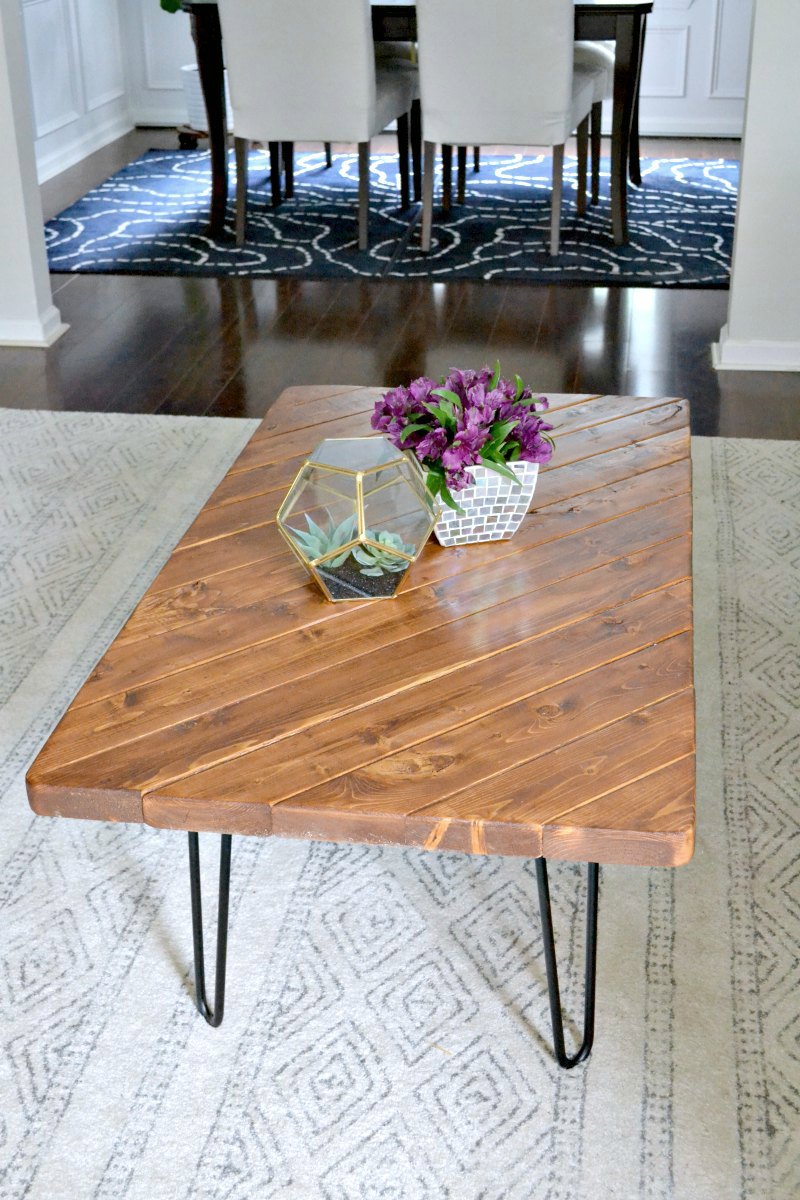
I first started with a scrap piece of plywood. Since it was scrap, I wasn’t really concerned about exact measurements, but the plywood was just shy of about 2 feet by 3 feet (the finished table with the 2×4 overhang comes to 25″W x 45″L x 17 5/8″H). I used the scrap plywood to get a sense of how big the finished table was going to look in the room (the scrap on top sticks out on all sides over the plywood eventually, so this is more of an estimate).
I gathered as many scrap 2x4s as I could find — some edges were more rounded because it’s framing lumber, and some is higher grade meant for my furniture projects. Ultimately, I want to have a nice slab or live edge round to make myself a coffee table, so my need for perfection and making everything match wasn’t a top priority (I would make everything look more uniform with sanding and staining later).
I played around with the angles a little until I found a way to use as many of my longer pieces of scrap as I could. The 45-degree angle looked best to me, so I cut a bunch of pieces on my miter saw at 45 degrees and then started lining them up.
As I got toward each edge, I began cutting smaller scrap pieces to square off each side. As you can see, it came together pretty swiftly!
With everything cut, I used a strong wood glue and my set of bar clamps to attach the 2×4 pieces to the plywood. This is only a first step, as I later reinforced things on the back with wood screws when I put the legs on (be sure to pre-drill these holes!).

As for the legs, I ordered hairpin coffee table legs off Amazon a couple of months ago and then forgot about them in the garage (the ones I actually purchased aren’t available as of this posting, so I’m linking to the ones that are the same style but just slightly cheaper). My boyfriend wound up hating the legs. But I built him a coffee table, so… tough (he wound up cleaning out my garage for me so that I could then sand and stain the table, so I consider that win-win if I get to build and he gets to clean, ha!).
Once the table was built, I completed the rest in the garage. The piece is pretty heavy, just FYI!

Because some of the edges were really rounded and some of the scrap was a little warped when putting it all together, I filled in some of the wider gaps or knots with wood filler. I like this stuff since it goes on pink, but if you know of any wood filler you LOVE, please let me know in the comments (I have asked all of my woodworking friends and I have been pretty much trying them ALL trying to find the best all-around stainable, paintable wood filler and have been getting lots of different answers, so it might be time for a head-to-head comparison review).

I sanded the whole piece several times with finer and finer grain sandpaper on my sander (starting at 80 for the rough spots, then 180, gradually working up to 240) and used a router to round off the outside edge. You can get as aggressive as you like with it, but I used the sander at 80-grit to create the rounded corners you see in the finished photos.

To finish, I used a golden mahogany stain and satin finish poly, sanding between coats with a sanding block. Then bam — back into the living room it went!

It was dark before I got a chance to take some photos, but my pup Charlie was really curious about it… so much that I had to make her a model in some of my shots. .


But earlier yesterday, I was able to take a few more photos. I’ve been using it for a couple weeks now, and my new hairpin leg coffee table has drastically improved entertaining like an adult and not eating food from the floor.


And as for Charlie… she’s still pretty curious about the new item in the living room.

(P.S. I am on the hunt for a new couch to go with the whiter/gray/black color scheme and hope to have that update for you soon!)

There you have it: my #2x4andmore challenge project. If you are making anything out of structural lumber, feel free to use the hashtag this week on Instagram, and be sure to check out the other projects I’ve linked up below (there’s a linky party too if you’d like to share over on Remodelaholic and it’ll be open all week as well). There are some truly great projects in this blog hop, so I’ve included links to the other participants below:

garden arbor | Remodelaholic
15 minute coffee table | The Ugly Duckling House (that’s here!)
tiered corner plant stand | Charleston Crafted
single-board rolling bar cart | Woodshop Diaries
outdoor bench w/rope detail | At Charlotte’s House
wall planter and herb garden | Making Joy and Pretty Things
upholstered x-base bench | Frazzled Joy
jumbo tic tac toe | Ginger Snap Crafts
porch bench | Everyday Party Magazine
console table | Hertoolbelt
farmhouse patio table | North Country Nest
easy flower planters | Our House Now a Home
treadmill incline | Practical and Pretty
patio side table | Small Home Soul

Don’t let those cutoffs from bigger woodworking projects and home DIYs go to waste! Here are tons of ideas on how to reuse the scrap — you can make gifts, décor, and more!


Hey there! I'm Sarah. My favorite things: 1) tearing my house apart and 2) putting it back together again. I occasionally talk about other things, like life and food and travel, but it's mostly my obsession with DIY and power tools that you'll find here!
Got a DIY question? Tag me on Instagram @uglyducklingDIY or use the hashtag #uglyducklinghouse to show off your projects!


This site uses Akismet to reduce spam. Learn how your comment data is processed.
I am in love with your table, that turned out great and I wouldn’t have thought to put the boards on the diagonal. It really elevates the design and is lovely in your living room. I have wanted a router for the longest time so I think it will be on my Christmas list this year. It’s nice to see I’m not the only person with a rug in their garage :) I’m so glad to connect with you via the #2x4andMore challenge, I’ll be subscribing as I love your style :)
Sarah says:
Thank you! I’m really glad to have found so many great projects from this challenge too! Anna says:This is gorgeous and I am totally digging this stain you used. Also, completely unrelated, I’ve had that rug in my cart for months wanting to buy it! I think it’s time to pull the trigger!!
Sarah says:
I really LOVE that rug! The dog likes it too, which is the only complaint so far (a good pre-treatment for stains is working out great though).
Kirstie says: Oh, that turned out stunningly! You are so creative, and I love it with the rug too! Charlotte says:I LOVE this. Simple and chic. Very very cool. I’m also embarrassed that I’ve never use my router on an edge… only for inside cuts. Yeesh.
Ginger Bowie says: Your coffee table is stunning! Love, love, love! Alex Leigh says: Oh my god this is the cutest little table! Denise says:I LOVE this table!! It’s so cool and I love that you made it out of scraps! My favorite way to DIY! It seriously came out amazing!
Naomi S. says:You are a wonder, girl! That is a beautiful, semi-rustic coffee table. I wish I could work with power tools and do something like that. But the weight of the sander or the router would probably be too heavy for my arthritic hands. I wish you lived close-by so I could commission you to build me lots of things!
Sarah says:
Haha, oh, I don’t know if my back could take the commissioned work! Ha! But they do have some lighter DIY products out there! My mouse sander (the one I used on this project) is actually very light-weight. But I do understand that physical limitations can be a challenge. I have wrist issues (I over-extend, and the reverberation on power tools can make it worse) and will probably need to get a brace soon. But for as long as I can, I’m going to do these projects because I truly love the sense of accomplishment at the end!
Sarah says:I LOOOVE your coffee table! The wood on a diagonal is so creative and different, it looks amazing! Plus, those hairpin legs are the perfect touch!
Sarah says:
Mina says:Hi there! I love this idea! I went and bought everything to make it and now my table is completely warped :( two of the ends have curled up and it isn’t laying flat. Can I fix this or is it a lost cause? It’s pretty bad. I haven’t even sanded it yet because it looks like it might be a lost cause. I secured the 2×4 pieces together with screws and a kreg jig, secured a 3/4″ piece of plywood to cover the entire bottom of the table once I noticed the bowing, and it’s still bowed. Now what? :(
Sarah says:
So sorry to hear this! Warping is never fun. I’m afraid I don’t really have a great answer; I used old scrap wood, so it had long since dried before I used it in my project. Usually warping/cupping happens from uneven drying. Local home improvement stores have so much inventory and turnover that it doesn’t really get enough time for all the moisture to leave the wood while in store, and even if it did, the moisture/humidity in your home or garage after you got it home could have reabsorbed into the wood and caused some warping too (here’s some info on that). I tend to bring new wood home and just let it be in my garage for a while out of sheer laziness, but it turns out that this also helps to acclimate the wood to my environment/home so I can work with it. Once wood begins to warp, you can try wetting it again and clamping it down on a flat surface or putting it in the sun on the opposite side to see if it helps to dry out the side that warped, but that could also lead to the screws splitting the wood since it’s all secured together now (I have never tried this myself so I’m going off of what I’ve found online here). If it were me, depending on how bad it was, I’d probably just pick up a few more sticks of wood and let them sit in my garage for a little while and then try again (given that the time lost on trying to fix it and that most of my scrap wood pile I used was the bare-bones cheap stuff, this would be the more preferable way for me and result in fewer swear words). I hope this doesn’t deter you from future woodworking endeavors, but I can definitely understand your disappointment. Oh — and if you try it again, finishing your furniture on ALL sides (top, sides, bottom) is also another way to help prevent bowing once you begin to use it (meaning, if you poly the top which would limit moisture exposure, do the same on the bottom since one side absorbing moisture from the air can LATER lead to other warping down the road).
Mina says:Thanks so much for your input!! I’m definitely going to try that wetting and clamping thing and just keep my fingers crossed! Next time I do something like this I guess I’ll just let it sit for a while before I start making things lol had to learn somehow! Thanks again :)
Sarah says:
Of course! That’s what this site is all about… I actually learn even more from reader input (like yours… I didn’t even think to consider what would happen to new wood since I was using old, and I found that article on trying to fix warping!). I have more than my fair share of mistakes on this site, so I know how it feels for sure when your high hopes suddenly come crashing down.
Jessica susan says:This is just absolutely gorgeous! What a beautiful and functional piece of furniture! The rug is so pretty and cozy!
Rayven says:Hello Sarah! I absolutely love your table and would like to make one of my own. I am a beginner and I have never worked with wood before so I’m a little hesitant. Do you have any tips that could possibly help me in the process? What kind of wood was it that you used? Also about how many 2×4’s do you recommend for this project? Anything you could tell me would be helpful. Thanks a bunch in advance! ☺️
Sarah says:
I would definitely recommend reading the other comments to get better acquainted with some of the things others learned in the process (such as where I started with scrap wood that already had lots of time to dry, another tried to use brand new sticks from the store and they experienced warping from the wood not acclimating, etc.). All that means is use wood that’s had a little time to dry out (the wood at the store is usually newly cut and will dry out once it gets time exposed to air). I used mostly plain (cheap) 2x4s that you can find in the lumber section of the hardware store (“whitewood” “pine” etc.). I don’t plan on keeping this table forever, so I went with cheap scrap, but if you make it out of nicer wood, you can make it look even more amazing. As for the number, I am not sure how many sticks it really comes out to since I used scrap pieces from different builds, but probably 3-4 sticks? I definitely think this is an easy project to learn from. The entire project can be easily adjusted to suit your needs as far as cuts go, so I’d say start how I did (with a piece of ply a little smaller than you wan the table), and just start making your cuts from the middle outward to the corners. Good luck!
Rayven says: Ahhh okay that’s makes sense. Thanks so much Sarah. You rock! ? Allen Michael says:This is so awesome! I’m quite curious if the plywood used as base is sturdy enough but it looks as though it is. I really love the design you made and the finish of this product! Really great job.
Sarah says:
Thank you! Yes, the plywood is fine as far as sturdy, but I recently read that you shouldn’t use plywood at all when securing down boards on top because it can lead to top boards splitting (since the wood moves with temp and humidity, securing it to plywood is more risky if it moves too much). But since this was made from scrap, it’s not something I’m super worried about.
Allen Michael says: Great feedback, thankyou again! Megan says:Was wondering If you could give me a cut list that I could take to the hardware store? Been on the hunt for the perfect diy coffee table but I’m not talented enough to figure out the measurements. Thanks so much
Sarah says:
Ok, I’ll put this on my to-do list and try to get that for ya! I honestly didn’t measure much when I made it (I hate measuring) but I’m writing it down and will make a point of it to follow up.