The Scan to File feature allows you to scan a document and automatically save it into a specified location on your computer.
If you are using the ControlCenter4 Home Mode interface as shown below, refer to: 'How to scan using the ControlCenter4 in Home Mode'
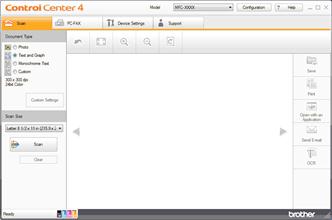
ControlCenter4 Home Mode Interface
Click the selection you require:
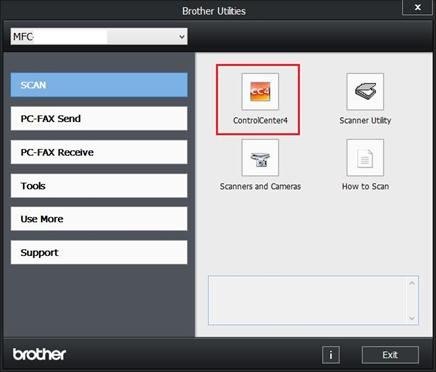
1. Open the ControlCenter4:
Windows 7 or earlier:

Windows 8 or 8.1:

a. Click Brother Utilities.
b. Click the dropdown list to select your model if it is not already selected.
c. Click Scan.
d. Click ControlCenter4.
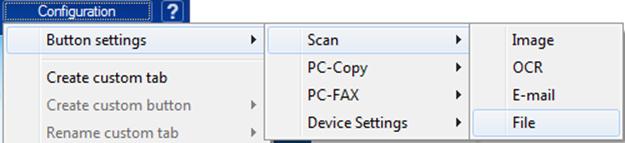
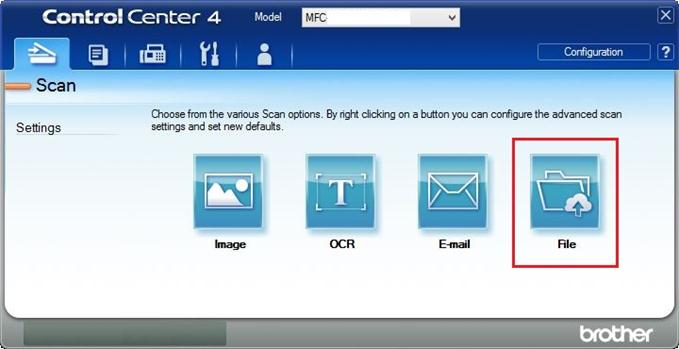
2. Click on Configuration => Button Settings => Scan => File. The FILE configuration window will appear.
3. You can configure the following properties:
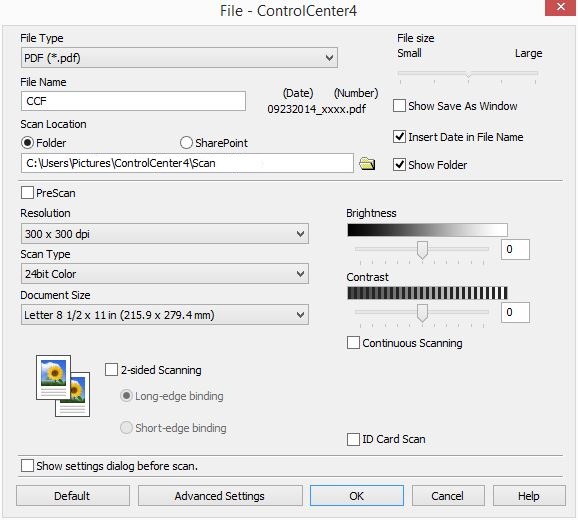
- File Type: The format that the file will be saved in.
When choosing Secure PDF, you have the option of setting a password. Click the key icon next to the file type and specify a password. TIFF format is available as Compressed or Uncompressed.
- File Size: (JPEG and PDF formats only) You can move the slider bar between small and large to adjust the file size.
This option is not available if the Scan Type is set to 'Black & White' or 'Gray (Error Diffusion)'.
- File Name: Select the default prefix for the scanned document's file name. The date and sequence number will be added to the end of this prefix.
I f you select Show Save As Window, you will be prompted to specify the file's name and destination every time you scan.
If you select Insert Date in File Name, the date will automatically be inserted in the file name of a scanned image.
- Scan Location Folder/SharePoint: Specify the location where the file will be saved.
If using the SharePoint option, enter the server address and click Connection Test .
If you select Show Folder, the destination folder will automatically display after each scan job is complete.
- PreScan: This option will allow you to preview the image before completing the scan.
- Resolution: This is how sharp an image will be based on the dots per inch scanned (DPI). The higher the DPI the clearer the image will be, however the scan time and document size will increase.
- Scan Type: This is the color scan option. The higher the color quality selected the longer the scan job will take to complete and the larger the file size will be.
- Document Size: Set the size of the document being scanned.
- Brightness: Adjust the setting (-50 to 50) to obtain the best image. The default value is 0, representing an average. You can set the level by dragging the slide bar to the right or left to lighten or darken the image respectively. You can also type a value in the box for the setting.
This option is not available if the Scan Type is set to 24-bit color.
- Contrast: You can increase or decrease the contrast level by moving the slide bar to the left or right. You can also type a value in the box for the setting. An increase emphasizes dark and light areas of the image, while a decrease reveals more detail in gray areas.
This option is not available if the Scan Type is set to Black & White or 24-bit color.
- 2-sided Scanning ( MFC-L2740DW Only ): Allows you to scan both sides of the document automatically using the Automatic Document Feeder (ADF).
- Continuous Scanning: Select this option if you would like to be prompted to scan multiple pages.
- ID Card Scan: Allows you to scan both sides of an ID card to the same page using the flatbed.
- Show settings dialog before scan/Don't show me again: Determines if the settings dialog window will appear first every time the scan button is clicked.
- Default: Restores the settings back to the default values.
- Advanced Settings: Allows you to adjust advanced settings. The available options will vary based on your machine's specifications.
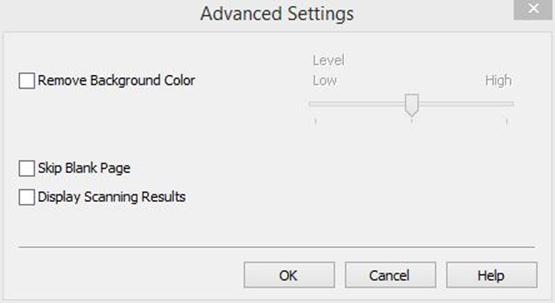
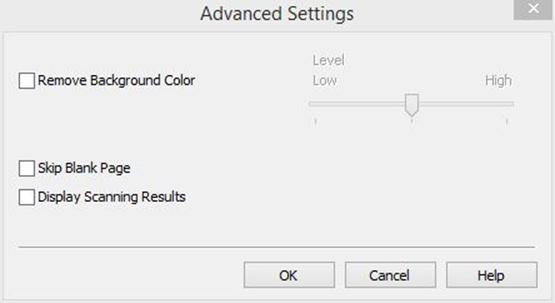
- Remove Background Color: Remove the base color of documents to make the scanned data more recognizable. When you use this function, select from three settings: high, medium, and low. (Available only for the Auto, True Gray and 24bit Color options)
- Skip Blank Page (MFC-L2740DW Only): Remove blank pages of the document from the scanning results.
- Display Scanning Results (MFC-L2740DW Only): Show the numbers of total pages saved and blank pages skipped on your computer screen.
4. Once you have configured each setting click OK. All subsequent scans will use these settings.
1. Place the document to be scanned on the scanner Flatbed or Automatic Document Feeder (ADF) depending on the model of your Brother machine.
2. Open the ControlCenter4:
Windows 7 or earlier:

Windows 8 or 8.1:

a. Click Brother Utilities.
b. Click the dropdown list to select your model if it is not already selected.
c. Click Scan.
d. Click ControlCenter4.

3. On the Scan menu left-click the FILE button.
If you have enabled the 'Show settings dialog before scan' option, then you will be prompted to choose your desired settings and then click Scan.
4. The document will now scan and save into the specified location.
CONFIGURE 'SCAN TO FILE' SETTINGS (FOR SCANNING FROM THE SCAN KEY ON THE BROTHER MACHINE)
1. Open the ControlCenter4:
Windows 7 or earlier:

Windows 8 or 8.1:

a. Click Brother Utilities.
b. Click the dropdown list to select your model if it is not already selected.
c. Click Scan.
d. Click ControlCenter4.

2. Click on Configuration => Button Settings => Device Settings => Device Scan Settings.
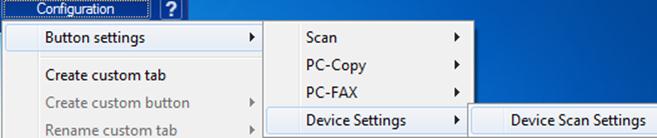
3. Click on the File tab at the top. You can configure the following properties:
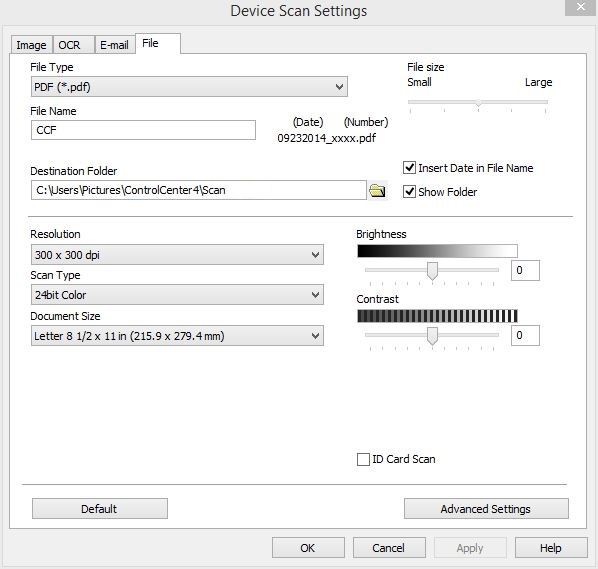
- File Type: The format that the file will be saved in.
When choosing Secure PDF, you have the option of setting a password. Click the key icon next to the file type and specify a password. TIFF format is available as Compressed or Uncompressed.
- File Size: (JPEG and PDF formats only) You can move the slider bar between small and large to adjust the file size.
This option is not available if the Scan Type is set to 'Black & White' or 'Gray (Error Diffusion)'.
- File Name: Select the default prefix for the scanned document's file name. The date and sequence number will be added to the end of this prefix.
If you select Insert Date in File Name, the date will automatically be inserted in the file name of a scanned image.
- Destination Folder: This is where you specify the location where the file will be saved.
If you select Show Folder, the destination folder will automatically display after each scan job is complete.
- Resolution: This is how sharp an image will be based on the dots per inch scanned (DPI). The higher the DPI the clearer the image will be, however the scan time and document size will increase.
- Scan Type: This is the color scan option. The higher the color quality selected the longer the scan job will take to complete and the larger the file size will be.
- Document Size: Set the size of the document being scanned.
- Brightness: Adjust the setting (-50 to 50) to obtain the best image. The default value is 0, representing an average. You can set the level by dragging the slide bar to the right or left to lighten or darken the image respectively. You can also type a value in the box for the setting.
This option is not available if the Scan Type is set to 24-bit color.
- Contrast: You can increase or decrease the contrast level by moving the slide bar to the left or right. You can also type a value in the box for the setting. An increase emphasizes dark and light areas of the image, while a decrease reveals more detail in gray areas.
This option is not available if the Scan Type is set to Black & White or 24-bit color.
- ID Card Scan: Allows you to scan both sides of an ID card to the same page using the flatbed.
- Default: Restores the settings back to the default values.
- Advanced Settings: Allows you to adjust advanced settings. The available options will vary based on your machine's specifications.
- Remove Background Color: Remove the base color of documents to make the scanned data more recognizable. When you use this function, select from three settings: high, medium, and low. (Available only for the Auto, True Gray and 24bit Color options)
- Skip Blank Page (MFC-L2740DW Only): Remove blank pages of the document from the scanning results.
- Display Scanning Results (MFC-L2740DW Only): Show the numbers of total pages saved and blank pages skipped on your computer screen.
4. Once you have configured each setting click APPLY => OK. All subsequent scans will use these settings.
1. Load your document.

2. Press (Scan) on the Brother machine's display.

3. Press ◄ or ► to display (to File) .

4. Press (to File) .
5. Do one of the following:
- Network Users, go to step 6 .
- USB Users, go to step 8 .
6. Press ▲ or ▼ to display the computer you want to send to.
7. Press the Computer name.
If the machine's display prompts you to enter a PIN, enter the 4-digit PIN for the computer on the machine's display and press OK.
8. Do one of the following:
- If you want to use the default settings, go to step 12 .
- If you want to change the current settings, go to step 9 .
9. Press OPTIONS .
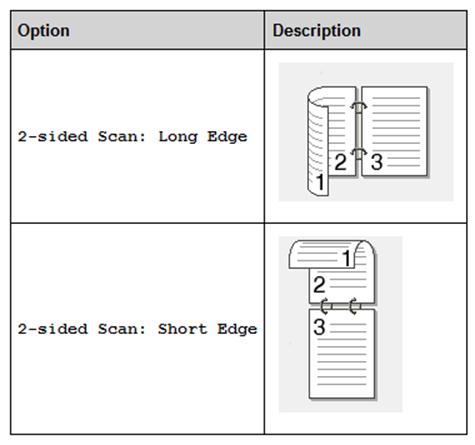
10. To scan both sides of the document ( MFC-L2740DW Only ):
- Press 2-sided Scan, and then select the document type.
11. Choose the scan settings you want to change: Scan Type, Resolution, File Type, Scan Size or Remove Background Color as needed and then press OK.
If you click Scan Settings, you may change where the scan settings are configured. The options are: Set from Computer or Set at Device.
If you want to save the settings as a shortcut, press Save as Shortcut.
12. Press START . The machine starts scanning. If using the machine's scanner glass, follow the Touchscreen instructions to complete the scanning job.